Products
Solutions
Resources
9977 N 90th Street, Suite 250 Scottsdale, AZ 85258 | 1-800-637-7496
© 2024 InEight, Inc. All Rights Reserved | Privacy Statement | Terms of Service | Cookie Policy | Do not sell/share my information

Tags are used to identify or mark records for filtering, sorting and reporting purposes. Think of them as you would any paper tag that you attach to an object to better identify it or find it when you need it.
Tags can be created and made available to all Tags fields throughout the system or can be created for specific Tags fields on specific forms. When created for a specific Tags field on a specific form, the list of available Tags for that field will be limited to those Tags assigned to that field and form. Tags that have not been assigned to a specific field and form will be available to all Tags fields on all forms. After data is tagged, it can be filtered, sorted, and grouped using the filtering and grouping features on the register containing the data.
| Examples |
Description |
|---|---|
|
Area |
Assign construction area to cost items |
|
Phase |
Assign construction phase to cost items |
|
Work Type |
Assign construction work types to cost items |
|
Estimator |
Assign an estimator’s name to a cost item for responsibility/tracking |
|
Estimate Scope |
Cost item tagging for secondary reporting scope needs |
|
Issues |
Issues to discuss during estimate reviews |
|
Risk Level |
Assign risk level to cost items for estimate reviews |
|
Division/District/Region Tags |
Division/District/Region tags |
|
Review Status |
Sections of the estimate that have been reviewed |
|
Contract Type |
Contract types |
|
Bid Review Date |
Date organization reviewed the bid |
|
Bid Award Date |
Date the bid was awarded |
|
Bid Place |
Track how the bid placed against competitors if not won |
|
Quantity Verification |
Cost item takeoff validation complete |
Users can take advantage of validated and non-validate tags in every register within estimate. It will be up to the organization on how they want to best leverage tags in each register.
A master set of Tags is created and stored in the Master Foundation Setup Data - Tags tab of the Library. When you create a new folder, the master set is automatically copied from the Library to the new folder. If you feel the current job requires new or different Tags to adequately categorize its cost items and resources, you can change, create, or delete them any time you want.
From the Backstage View, select Library from the left pane navigation.
From the Ribbon, select the Setup tab.
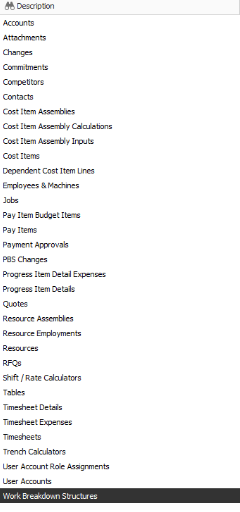
Under the section Master Initialization, select the Foundation Setup Data button. The Foundation Setup Data Register opens.
From the Foundation Setup Data Register, select the Tags tab.
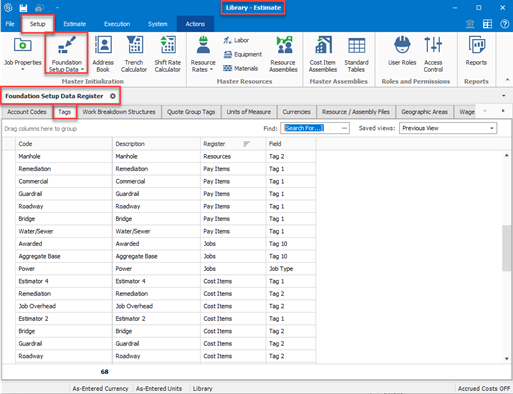
Click in the first blank cell in the Code column. Then enter the code that defines the tag.
In the Description field, enter a description for the tag.
In the Register field, define the type of item to associate with this tag.
In the Field column, define the tag field to associate with this tag.

Repeat the previous steps to add additional tags.
The following steps walk you through how to create validated tags within a User Tag Record.
From the Backstage View, select Library from the left pane navigation.
From the Ribbon, select the Setup tab.
Under the section Master Initialization, select the Foundation Setup Data button. The Foundation Setup Data Register opens.
From the Foundation Setup Data Register, select the Tags tab.
Select the Actions tab.
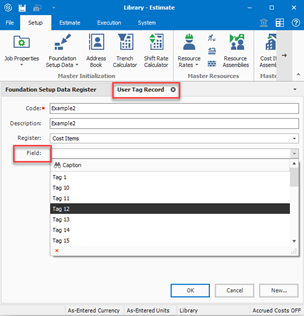
Under the Edit section, select New. A new User Tag Record opens.

In the Code column, enter the code that defines the tag.
In the Description field, enter a description for the tag.
In the Register drop down, define the type of item to associate with this tag.
In the Field drop down, define the tag field to associate with this tag.
When you are finished, click OK to close this record and return to the register.
Repeat the previous steps to add additional tags.
To edit pre-existing tags, select the tag you want to edit. Then, in the Actions tab, click Open. The User Tag Record opens.
The following steps walk you through how to assign validated tags to cost items.
From the Ribbon, select the Estimate tab.
Then select Cost Breakdown Structure (CBS).
Double-click the row that you want to assign tags. The Cost Item Record for that row opens.
e.g., Direct Cost Add-On, Indirect Cost Escalation, etc.
Select the Cost Item Setup default data block in the lower right portion of the record.
Select a tag to add to the Tag 1 field drop down.
Select the Cost Item Setup default data block in the lower right portion of the record.

If the tag that you want to assign does not display in the drop-down list, you have the ability to add a new tag by clicking on the green plus button that shows to the left of the validation button and adding the new tag to your job's foundation data

Repeat the previous steps to add additional tags.
The following steps walk you through how to assign validated tags to an employed resource.
Estimate provides you with the ability to assign specific tags on a resource-by-resource basis for each employed resource on a cost item.
Tags are master codes and descriptions that are used, generally, for sorting and filtering purposes and allow you to group like data for reporting and review purposes.
From the Ribbon, select the Estimate tab.
Then select Cost Breakdown Structure (CBS).
Double-click the row that you want to assign tags. The Cost Item Record for that row opens.
e.g., Direct Cost Add-On, Indirect Cost Escalation, etc.
In the Cost Item Record, select the Detail tab.
Select a resource row in the Detail tab and then select the Employment Setup default data block in the lower right portion of the record.
Select a tag for the Tag 1 field using the drop down list.
If the tag that you want to assign does not display in the drop-down list, you have the ability to add a new tag by clicking on the green plus button that shows to the left of the validation button and adding the new tag to your job's foundation data.
Repeat the previous steps to add additional tags.
Tags are master codes and descriptions that are generally used for sorting and filtering purposes, and they allow you to group like data for reporting and review purposes.
From the Ribbon, select the Price tab.
Under the Pay Items section, select Pay Item & Proposal. The Pay Item & Proposal Register opens.
In the register, select the pay item that you want to assign a tag.
Find and click into the Tag 1 field. Then select a tag from the drop down list.
If the tag that you want to assign does not display in the drop-down list, you have the ability to add a new tag by clicking on the green plus button that shows to the left of the validation button and adding the new tag to your job's foundation data.
Repeat the previous steps to add additional tags.
From the Ribbon, select the Price tab.
Under the Pay Items section, select Pay Item & Proposal. The Pay Item & Proposal Register opens.
In the register, select the pay item that you want to assign a tag.
On the Actions tab, click Open to open the Pay Item Record.
From the Pay Item Record, select the Tags / User Defined Fields tab.
Click the Tag 1 field. Then select a tag from the drop down list.
If the tag that you want to assign does not display in the drop-down list, you have the ability to add a new tag by clicking on the green plus button that shows to the left of the validation button and adding the new tag to your job's foundation data.
Repeat the previous steps to add additional tags. Once done, click OK.
From the Ribbon, select the Estimate tab.
Under the Breakdown Structure section, select Cost Breakdown Structure (CBS).
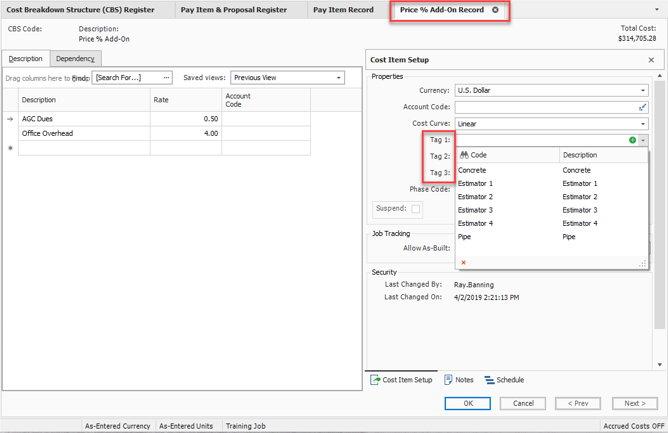
Double-click on the PRICE % ADD-ON row.
Under the Cost Item Setup default data block, click in the Tag 1 field. Then, select an account code using the drop down list.
If the tag that you want to assign does not display in the drop-down list, you have the ability to add a new tag by clicking on the green plus button that shows to the left of the validation button and adding the new tag to your job's foundation data.
Repeat the previous steps to add additional tags. Once done, click OK.
Tags are master codes and descriptions that are generally used for sorting and filtering purposes, and they allow you to group like data for reporting and review purposes.
From the Ribbon, select the Quote tab.
Under the Quote Management section, select Quotes.
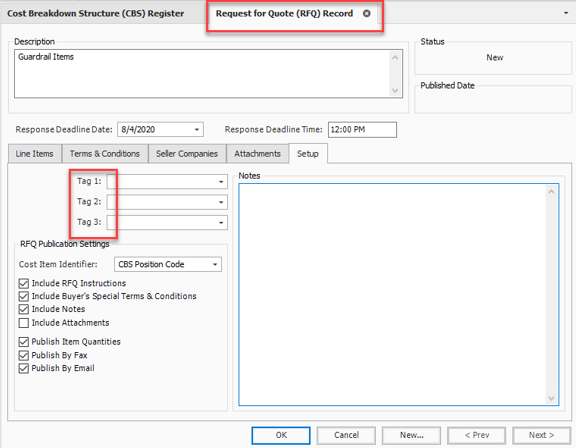
Open the preferred Request for Quote Record by highlighting it on the Quote Register.
Then select the Actions tab. Under the Edit section, select Open. The Quote Record opens.
Under the Setup default data block, click in the Tag 1 field. Then, select a tag using the drop down list.
If the tag that you want to assign does not display in the drop-down list, you have the ability to add a new tag by clicking on the green plus button that shows to the left of the validation button and adding the new tag to your job's foundation data.
Repeat the previous steps to add additional tags. Once done, click OK.
Additional Information
9977 N 90th Street, Suite 250 Scottsdale, AZ 85258 | 1-800-637-7496
© 2024 InEight, Inc. All Rights Reserved | Privacy Statement | Terms of Service | Cookie Policy | Do not sell/share my information